
Part 9: Tower of the Gods
Inside the Tower of the Gods will be a rising and falling level of water. Travel to the right of the room and wait for the water level to go down to reveal a door. Go inside the door and use the boomerang to defeat the Yellow Chuchu in the room.
Wait for the water to level rise and place a bomb on the ledge next to the bomb wall on the right of the room. After blowing up the wall you will have access to a small chest that contains the Dungeon Map. Now exit the room and jump back onto King of Red Lions.
Wait for the water level to rise and jump onto the platform with the door to the north. Grab one of the statues and place it on the colorful switch to unlock the door. In the next room jump down to the center and place one of the small crates on the colorful switch.
Climb back up the ladder towards the door you entered and wait until the water level goes down - in turn placing the crate back on the switch. Run across the rainbow bridge and pick up the statue. Now travel back across the bridge and out the door.
Turn left and walk forward a small way in order to place the statue in the center of the small area beneath the shelter. Use the King of Red Lions to travel through the newly opened passage. Now pick up both statues and place them on the switches.
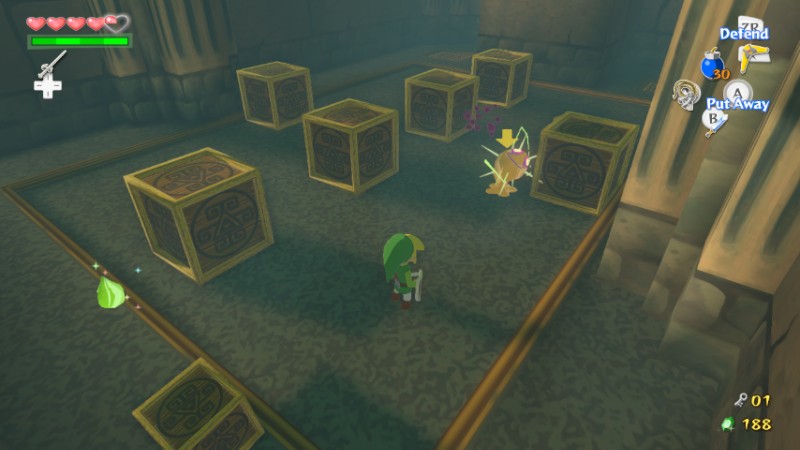
In the next room you need to move the one wooden crate that is nearly in line with the rest - as seen in the screenshot below - so that Link can jump across with a torch in order to light the unlit torches. Once the torches are lit a small chest will appear containing a small key.
Exit the room and sail back down the passage and towards the other side where the bomb able rock walls are located. Use the cannon to blow up the walls. Now climb across and wait for the water level to fall. There will be a locked door at the bottom of a set of stairs once the water has fallen.
Use the small key to enter the door and kill all of the Yellow Chuchu to make a bridge appear. Climb to the top and pick up the statue. Carry it back down and through the door making sure not to drop it in the water. Once through the door - turn left and take the statue up the stairs and place it in the center of the cabana.
Now light one of the sticks with the torch and run down the stairs. Light both of the torches to make a chest appear containing a Joy Pendant. Now go into the door near the statue that you just put down. Inside this room will be a chest containing the Compass.
Return to the King of Red Lions and travel to the mouth in the center of the room that is now devoid of a water spout. Follow the path and enter the door to the next area. In this room you need to pick up the statues and set them on the switches on the opposite side of the room.
After placing both of the statues simply stand on the third and final switch in order the make the platforms start moving. Use the platforms to go up and to the next door. Inside this room will be several locked doors but the one of the right will be glowing and unlocked.
Go through the glowing door and jump onto the moving platform. Ride it to the other side and then jump off. Now go through the door and travel to the opposite side of the room. Call the statue and it will begin following Link around. Travel back towards the door and once you are out from under the light platform - pick up the statue and jump across to the door.
Learning the Command Melody
Carry the statue back across the moving platform and through the door. The statue will cause a tablet to form in the center of the room with a song inscribed on it. Check the tablet in order to learn a new song - the Command Melody. This song will give Link the power to control nearby objects.
Now look around the room to find the next glowing door. Enter it and use the Grappling Hook to swing across to the opposite side of the room. Enter the door near the switch. Use the Grappling Hook to swing across the gap. Now call the statue and then stand on the switch.
Play the Command Melody to gain control of the statue - with Link on the switch - and travel across towards the door. Once the statue is across the bridge go back to Link. Use the Grappling Hook to swing back across to the door.
Getting the Hero's Bow
Pick up the statue and enter the door - place the statue on the switch to unlock the center door. Swing across to the newly unlocked door and go through it to find the dungeon mini-boss. Simply parry the attacks in order to get behind the mini-boss.
Use the sword to attack the back in order to remove the armor. Now just keep attacking until the creature is defeated. A chest will spawn in the center of the room containing the Hero's Bow. Exit through the door and use the bow to shoot an arrow at the Eye on the wall.
This will cause two moving platforms to appear in the center of the room. Use the Grappling Hook to swing back across to the statue. Pick it up and jump across the moving platforms in order to reach the door. After going through the door the statue will unlock the next glowing door.
In the next door jump onto the left swinging platform. Now use a bomb to blow up the wall and enter the door. Stand on the crest and play the Wind's Requiem to spawn a chest that contains a Treasure Chart. Exit the room and swim across the water to make it to the door.
In the next room use the Bow to kill all of the creatures and shoot both of the Eyes. This will cause the platforms the Eyes are on to start moving. Make your way to the lowest most Eyes platform to get to a chest containing a small key. Exit through the door and climb up the ladder.
Throw two statues on one side of the scale to raise the other. Now jump across the higher scale to reach the locked door. Use the small key to enter the door and order to find the next statue blocked by lasers. Simply climb on top of the crate in the front of the room and use the Deku Leaf to float over to the statue.
Call the statue and then play the Command Melody. Move the statue through the lasers and onto the switch. Now switch back to Link and go pick up the statue. Travel through the door and throw the statue onto the scales. Kill the new enemy and then start throwing the statues near the door onto the opposite scale.
Once you have tossed three statues jump over to the moving statue and pick it up. Jump over towards the door and go through it. The final statue will get into place and unlock the passage forward - a beam of light in the center of the room.
Getting the Big Key
Jump into the light to travel to the next room. Once here you will find a locked door with two statues. Carry both of them to the switches on the opposite side of the room. Use Link to press the third switch in order to unlock the big chest containing the Big Key.
After opening the chest the statues will come alive. Simply target and shoot them with an air to stun them. Now attack their backs with the sword to defeat them. This will unlock the door to the next room which will actually be a set of stairs traveling across the outer edge of the tower.
Travel up the stairs making sure to shoot the Blue Beamos with an arrow whenever you come across one. Once at the top of the stairs you can break the pots to rejuvenate Link's health in order to get ready for the boss of the dungeon.
Tower of the Gods Boss: Gohdan
This boss is rather similar to Bongo-Bongo from Ocarina of Time in a sense. The player needs to shoot the hands with arrows in order to stun them. Once the hands are stunned - shoot the red eyes of the head. This will cause the head to lower and open its mouth. Toss a bomb inside to damage it. Repeat this process several times in order to beat the boss.
Now grab the Heart Container and jump into the portal. Climb up the ladder and then use the Grappling Hook to ring the bell. After ringing the bell a portal will form and the King of Red Lions will take you into it. Upon entering the portal, the King of Red Lions will tell Link to retrieve the item that can defeat Ganon and all will be made clear about the land Link just entered.
Back to Part 8: Nayru's Pearl | Continue to Part 10: Hyrule Castle
